Lab 11: Optical Illusions
In this lab you will create some simple geometric optical illusions. In the process, you will familiarize yourself with the graphics and image display capabilities of python's opencv package, and gain experience using single and nested loops.
Optical Illusions

Installing Python packages
Install the opencv and numpy packages using pip.
python -m pip install --user opencv-python
python -m pip install --user numpy
Task
Complete the methods in Lab11.py, as shown below.
# CS 171 - Lab 11
# Your name(s) here
# use
# python -m pip install --user opencv-python
# python -m pip install --user numpy
# to install these python packages
import numpy as np
import cv2 as cv
# Define image dimensions
width = 512
height = 512
def example():
# create a blank image
img = np.zeros((width,height,3), np.uint8)
# draw a white (255,255,255) rectangle with corners at (100,200) and (300,400)
# the -1 indicates it is filled
cv.rectangle(img, (100,200), (400,500), (255,255,255), -1)
# draw a filled circle at (250, 350) with a radius of 125
# the -1 indicates it is filled
# lineType=cv.LINE_AA indicates anti-aliasing (less jagged boundary)
cv.circle(img, (250, 350), 125, (0,0,0), -1, lineType=cv.LINE_AA)
# draw a blue circle at (250, 350) with a radius of 125
# and a line thickness of 10
# note colors are specfied as a (blue, green, red) tuple
cv.circle(img, (250, 350), 50, (255,0,0), 10, lineType=cv.LINE_AA)
# draw a gray diagonal line
# since this is drawn last, it is on top of everything else
cv.line(img, (0,0), (width,height), (128,128,128), 10, lineType=cv.LINE_AA)
return img
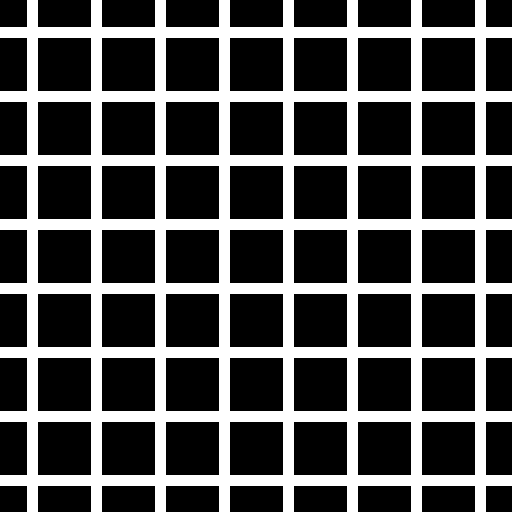
def checkerboard(nx, ny):
img = np.zeros((width,height,3), np.uint8)
dx = width//nx
dy = height//nx
for i in range(nx):
for j in range(ny):
x = i*dx
y = j*dy
if (i+j)%2 == 0:
cv.rectangle(img, (x,y), (x+dx,y+dy), (0,0,0), -1)
else:
cv.rectangle(img, (x,y), (x+dx,y+dy), (255,255,255), -1)
return img
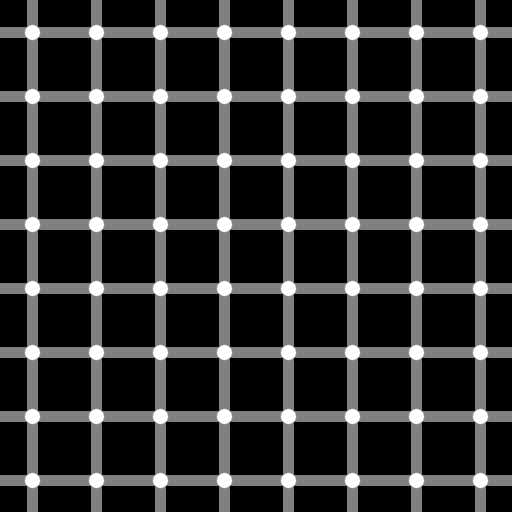
# https://michaelbach.de/ot/lum-herGrid/index.html
# Hint: use a loop to draw the vertical lines
# and a loop for the horizontal lines
def HermannGrid(nx, ny):
img = np.zeros((width,height,3), np.uint8)
return img
# https://michaelbach.de/ot/lum-scGrid/index.html
# Hint: Start with your Hermann Grid code
# use a doubly nested loop to draw the circles
def ScintillatingGrid(nx, ny):
img = np.zeros((width,height,3), np.uint8)
return img
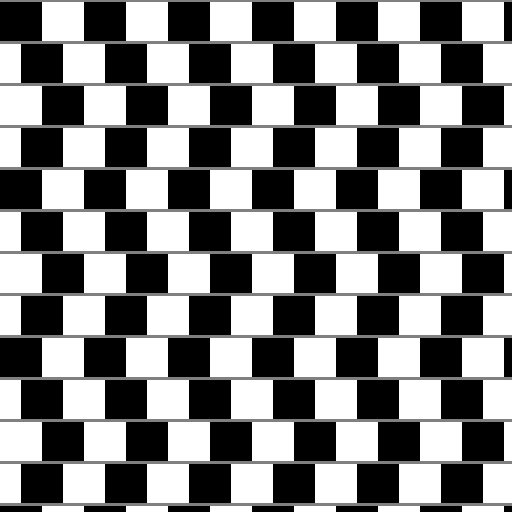
# https://en.wikipedia.org/wiki/Caf%C3%A9_wall_illusion
# Hint: Start with your checkerboard code
# change the offsets based on the row mod 4
def CafeWall(nx, ny):
img = np.zeros((width,height,3), np.uint8)
return img
def main():
img = example()
output = "output.png"
while True:
cv.imshow('CS 171 Lab', img)
key = chr(cv.waitKey(0))
print(key)
if key == 'q':
break
elif key == 'e':
img = example()
elif key == 's':
cv.imwrite(output, img)
elif key == '1':
img = checkerboard(8, 8)
output = "checkerboard.png"
elif key == '2':
img = HermannGrid(8, 8)
output = "HermannGrid.png"
elif key == '3':
img = ScintillatingGrid(8, 8)
output = "ScintillatingGrid.png"
elif key == '4':
img = CafeWall(12,12)
output = "CafeWall.png"
elif key == '5':
img = bulgingCheckerboard(13,13)
output = "output.png"
cv.destroyAllWindows() # close all windows
main()
When you are finished, email your lab files to your lab partner(s) and instructor.